
If you’re curious about trying henna out on a small patch of hair or you’re doing a touch-up, this post is just for you. You can also watch how I do a touch-up on YouTube.
I’ll be adding amla tea – and a flowery essential oil that strengthens while adding a gorgeous, sensual scent to the hair.
Henna is great for hair in many ways.
It can:
• Strengthen hair
• Promote hair growth
• Reduce hair fall
• Prevent dandruff
• Control scalp itchiness
• Be used as a natural hair dye
• Be used to cover greys
I’ve also written a longer blog post about on how to apply henna (for full hair coverage), and you can find other blog posts about henna here.
I’ve been using henna for about three years now and tend to use it about twice a year to strengthen my Sisterlocks and to cover greys.
When I do a touch-up, I only do part of my head (the front, sides and middle sections) and I only cover the root section, up to about a third to halfway along the length of my Sisterlocks.
Safe and natural
The beauty of pure, organic henna is that it is a safe and natural alternative to artificial dyes and it doesn’t contain any ingredients that are harmful to our hair.
That said, always remember to do a patch test (and a grey strand test) when using henna for the first time, or when switching to a different brand of henna, just to be on the safe side.
And remember to check the ingredients on the pack to ensure that it is pure henna and that the powder does not contain anything else.
The tools you’ll need
For your henna express touch-up, you’ll need to line up the following tools:
Protective gloves
Tablespoon
Measuring cup
Application brush/mixing brush
Mixing bowl (glass or ceramic)
Clingfilm (Saran wrap)
Old towel
Old T-shirt
The ingredients
1/2 cup – henna powder
2 tbl – Extra virgin olive oil 1/2 cup – Water
Shea butter/shea butter body butter blend
Optional ingredients:
1/4 to 1/2 cup – Amla tea (made by mixing amla powder with hot water and straining) OR black coffee – to reduce the reddish-brown hue of the henna
5 drops – Ylang ylang essential oil – to scent your henna mix and for extra hair benefits
Amla – benefits
Amla helps to:
Strengthen hair and scalp
Prevent greying
Stimulate hair growth
Ylang ylang essential oil – benefits
Ylang ylang is a relaxing floral essential oil with a sensual scent. It:
Reduces hair loss
Strengthens hair follicles
Conditions the hair
Adds shine
Stimulates hair growth
Mixing the henna
Prepare your henna at least 8 hours before you intend to apply it. This involves mixing the henna powder with water and some oil and leaving it to do its work.
During this time the lawsone dye in the henna will be released, and it is that which will stain or colour your hair when you apply it. You can see the dye in the mixture – it’s changed colour since I mixed it.
Make sure your mixture is of a batter-like consistency – not too runny and not too thick. The olive oil will add extra moisture (as henna can be drying) and a bit of slip to the mixture. Extra virgin olive oil is rich in vitamin E (contains antioxidants and supports and maintains a healthy scalp; essential for hair health), and it conditions and nourishes the strands.
Add the amla tea and the ylang ylang (or other essential oil of your choice) to the mixture before you cover it and set it aside for 8 to 12 hours (or up to 24 hours, maximum).
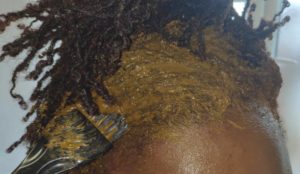
Applying the mixture
If you have long hair, section off the area you want to add the henna too, and then just work through, applying the henna to the Sisterlocks, parting a few rows at a time.
I find it’s better than trying to apply it to single rows, because the mixture will seep in and bind to the Sisterlocks, and creates less mess than trying to do it row by row. But it’s a trial and error thing. If you have very thick hair, you may find a system that works better for you.
Once you’ve covered the sections or parts of sections you want to cover with a brush, go in with your fingers to check that you haven’t missed any sections. Wearing double gloves means your fingers will be protected – henna stains everything!
Once you’re done, cover fully with cling film (saran wrap) and let it sit for up to 5 hours. I don’t leave it on for more than that and leaving it on for less than 2 or 3 hours may not give the dye enough time to do its work.
Rinsing out the henna
This will take a while but persevere. You should rinse (cool water is better, I find), until the water runs clear. Once it is clear, apply diluted shampoo.
Work that through and then follow with a second round of shampoo – and then rinse thoroughly.
Be sure to rinse, rinse and rinse, until the water runs clear.
Wrap your Sisterlocks with a towel and blot dry.
Time to oil your scalp!
As henna can be a little drying, add some oil to your scalp. I use a DIY oil blend and work it through each of the partings and then add a little to the length of the Sisterlocks afterwards.
That’s it, your henna express touch-up is done!