
I’ve been using henna on my hair for about 3 years now. I usually apply it twice a year. I find that it’s a great way to cover those longer and sprouting grey hairs.
Henna also has other benefits too. It is healing, conditioning and rejuvenating. It strengthens the hair follicles and it thickens the strands by coating them.
And of course henna adds that reddish hue to your hair that it is so well known for. For those of you who would like the benefits of henna, without the henna hue, you can apply indigo to your hair, after you’ve finished applying and washing out the henna, to have a dark hair colour, but I won’t be covering indigo here because it isn’t something I have personal experience of, as I have never used it.
One quick side note, do steer clear of black henna – as the chemicals used to get the black colour can be dangerous!
What You’ll need
Here are all the things I’ll be using for the henna application. And if you have long hair, you’ll need some scrunchies, hair bands or hair ties.
Tools
Protective gloves
Tablespoon
Measuring cup
Application brush/mixing brush
Mixing bowl (glass or ceramic)
Old towel
Old T-shirt
Clingfilm (Saran wrap)
Ingredients
Shea butter/shea butter body butter
Extra virgin olive oil – 2 tablespoons
Henna powder – 1 cup
Water – add gradually, a little at a time
Granulated coffee (optional, to darken the henna) – 2 teaspoons in a 1/4 cup of water
Making the paste
The olive oil makes the liquid smoother. Henna can be drying, and adding olive oil provides some great benefits to your hair and scalp and to help eliminate the drying effects of the henna. I use extra virgin olive oil as it has more of the natural vitamins. It’s made using pure, cold pressed olives to extract the oil and does not include processed oils. Processed oils may be heated, filtered and/or treated with chemicals. So do check the label and use reputable oils.
Mix the powder with water until you have a thick batter consistency. It is important for it not to be too runny otherwise it will run down your neck and forehead when you apply it – and will get everywhere!
*If this is your first time using henna, or the first time using a different brand of henna, please do a patch test on your arm and wait until 24 hours after washing off the patch test. For extra reassurance, for example if you have a sensitive scalp, do a patch test on a small section of your scalp and wait for 24 hours. If you see any signs of itching, swelling, soreness or other irritation, do not continue. You may also want to do a strand check with a grey strand of hair to check that you’re happy with the colour on your grey hair.
Applying the henna
Start by applying shea butter (or a shea butter body butter – I use the latter which I make myself because it’s easier to apply and is very moisturising) around the edge of your hairline and the tops of your ears.
Put on your protective gloves (I wear two of those thin gloves on each hand as my nails go through them!) – and let’s begin.
Apply the henna to your hair. I start on the sections where most of the grey hair is and then work my way through to the rest of the hair.
I do my hairline last before wrapping several times with cling film. You need the cling film to keep the henna moist – to make sure that the henna doesn’t dry out. If it dries out, the action of the colour will stop and trying to wash out rock hard henna is horrible. I have tried it!
Washing out the henna
Using gloves, unwrap the cling film carefully (your henna should still be moist all the way through if you’ve wrapped it well), and rinse your Sisterlocks until the water runs clear. I normally wash my hair in the shower, but when using henna, I do it over the side of the bath to avoid getting it in my eyes because henna gets everywhere!
After you’ve washed it out fully and the water runs clear, apply shampoo (I dilute my shampoo in water first). The shampoo will draw out more henna. I usually do two lots of shampooing.
Once the water runs clear again, you’re done!
Time to wrap your hair in a dark towel (to keep out the fluff and lint of lighter fibres), and then lightly oil your scalp.
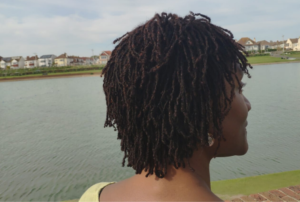
The results!
You’ll notice the colour straight after rinsing out the henna. The full colour will develop more over the days that follow.
The red/orange hue has been toned down because of the coffee I used in my mixture, and I like this hue. You’ll notice that the greys come out visibly lighter than the rest of the hair. Over time, the continued use of henna will impart a reddish hue to all of your hair, even the darker strands, if you apply the henna using the method I’ve used in this video.
One other thing to mention is that you will notice a very strong smell of leaves (which comes from the leaves, bark and flowers – of the henna plant)! The smell will fade in time and will go completely after you next wash your hair.

3 thoughts on “Sisterlocks – how to dye your hair with henna”
Comments are closed.